Pharmaceutical Elemental Impurities Analysis System - Caracteristici
Energy Dispersive X-ray Fluorescence Spectrometer
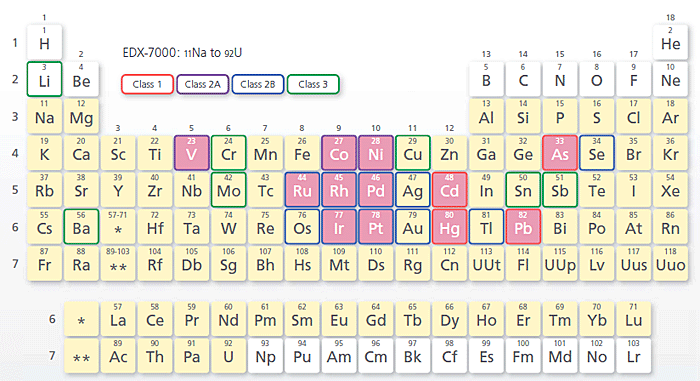
Detected Element Range and Elements Subject to the ICH Q3D Guideline

- An optional vacuum measurement unit or helium purge unit is required to measure light elements (15P and below) with the EDX-7000.
- The pink grid squares indicate elements that can be accommodated by the Pharmaceuticals Impurities Analysis Method Package (optional).
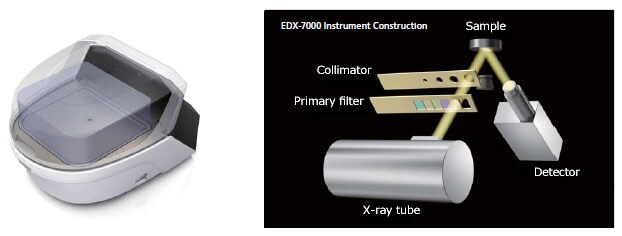
Instrument Construction
The optical system is a bottom exposure type in which both the X-ray tube and the detector are built into the bottom of the instrument. Samples simply need to be placed in the measurement area (the part with the hole) within the sample chamber. The instrument is so designed that the shutter on the X-ray tube will not open unless the sample chamber lid is completely closed, which prevents X-rays from leaking outside the instrument.

Positioning Powder and Liquid Samples
When analyzing powder and liquid samples that cannot be positioned as is in the measurement area, place the sample in a sample cell covered with a special film for X-ray fluorescence. Then start analysis by irradiating the sample with X-rays through the film.

Efficacy of the Background Internal Standard Correction Method
With the heavy elements included in organic substances, even fluorescent X-rays generated from deep in the sample penetrate the sample and reach the detector. As a result, the intensity of the fluorescent X-ray changes depending on differences in the sample amount (sample depth). Accordingly, scattered rays (background) generated when X-ray irradiation from the X-ray tube strikes the sample are utilized for internal standard correction, thereby correcting quantitative determination errors due to the sample depth and form.

| Element | Material | Cellulose | ||
|---|---|---|---|---|
| Sample Amount | 2.0 g | 1.0 g | 0.5 g | |
| Cd | Without internal standard correction | 10.3(0.9) | 7.0(0.8) | 5.1(0.6) |
| With internal standard correction | 9.9(0.9) | 10.5(1.1) | 10.5(1.3) | |
| Pb | Without internal standard correction | 10.5(0.5) | 8.9(0.4) | 6.2(0.2) |
| With internal standard correction | 10.0(0.5) | 9.3(0.5) | 9.8(0.4) | |
| Rh | Without internal standard correction | 11.6(0.8) | 8.9(0.7) | 6.9(0.6) |
| With internal standard correction | 10.7(0.7) | 10.4(0.8) | 10.7(1.0) | |
Precautions Prior to Installing the Package
- It may not be applicable for materials containing a large amount of additives, minerals or other inorganic components. Consign the analysis or perform other checks before installing the package.
- Overlap correction measurements, dilution of the standard solution, and creation of the calibration curve are performed by the user in accordance with the instruction manual included in the package.


